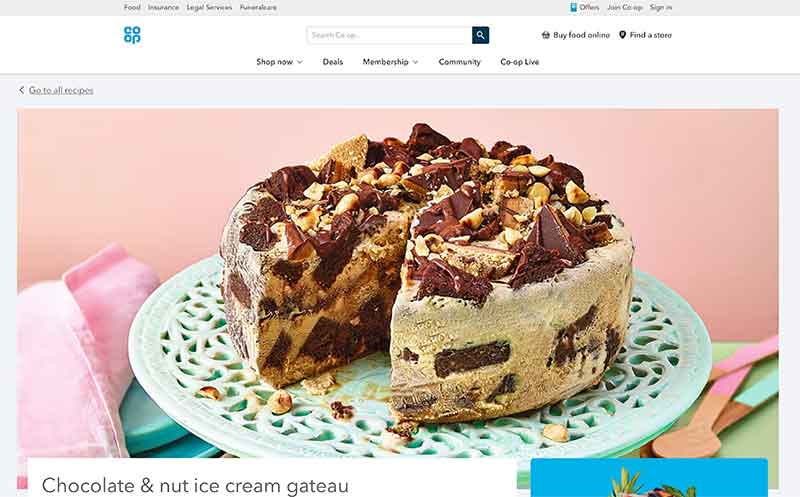
Jose Mier, Sun Valley, CA’s resident frozen dessert guru, has just found a scrumptious recipe on a UK website for a chocolate and nut ice cream gateau. Check out this 30 minute recipe on the CoOp website.
Creating an ice cream cake with vanilla ice cream, chocolate brownie bits, and toasted hazelnuts is a delicious and exciting treat that combines smooth creaminess, rich chocolate, and nutty crunch. This combination is perfect for lovers of classic flavors with a twist, as the textures blend into a decadent dessert. Below, I’ll walk you through the process of making this mouth-watering cake, discuss the ingredients in detail, and suggest ways to customize or elevate the recipe even further.
Ingredients Overview
Before diving into the step-by-step instructions, let’s take a moment to appreciate the ingredients:
- Vanilla Ice Cream: This is the base of the ice cream cake. Vanilla ice cream provides a rich, creamy texture with a subtle yet sweet flavor that complements various toppings and mix-ins. It’s the perfect neutral flavor that balances the richness of the other components.
- Chocolate Brownie Bits: Adding brownie pieces brings a chewy, fudgy element to the cake. The chocolate adds a more intense, indulgent flavor, while the soft texture of the brownie bits contrasts beautifully with the creamy ice cream.
- Toasted Hazelnuts: The addition of toasted hazelnuts introduces a nutty, earthy flavor and crunchy texture. Hazelnuts, when toasted, become fragrant and add a layer of sophistication to the dessert. Their slight sweetness and buttery texture pair excellently with both vanilla ice cream and brownies.
Step-by-Step Recipe
Step 1: Preparing the Brownies
Before assembling your ice cream cake, you’ll need to bake and prepare your brownies. Here’s how to do it:
- Ingredients for Brownies:
- ½ cup (115 g) unsalted butter
- 1 cup (200 g) granulated sugar
- 2 large eggs
- 1 teaspoon vanilla extract
- ½ cup (65 g) all-purpose flour
- ⅓ cup (40 g) unsweetened cocoa powder
- ¼ teaspoon salt
- ¼ teaspoon baking powder
- Instructions:
- Preheat your oven to 350°F (175°C). Line an 8×8 inch baking pan with parchment paper.
- Melt the butter in a medium saucepan over medium heat. Once melted, remove from heat and whisk in the sugar, eggs, and vanilla extract until combined.
- Sift the flour, cocoa powder, salt, and baking powder into the wet ingredients. Gently fold the dry ingredients into the mixture until fully incorporated.
- Pour the batter into the prepared pan and bake for 20-25 minutes or until a toothpick inserted in the center comes out clean.
- Allow the brownies to cool completely before cutting them into bite-sized pieces. Set the pieces aside for later use.
Step 2: Toasting the Hazelnuts
Toasting the hazelnuts brings out their rich flavor, which adds another layer of depth to your ice cream cake.
- Toasting Instructions:
- Preheat the oven to 350°F (175°C).
- Spread the hazelnuts evenly on a baking sheet.
- Toast in the oven for 10-15 minutes, shaking the tray halfway through to ensure even toasting.
- Once they’re golden and fragrant, remove the hazelnuts from the oven and allow them to cool.
- Rub the hazelnuts between your hands or in a kitchen towel to remove most of the skins. Roughly chop the hazelnuts and set them aside.
Step 3: Assembling the Ice Cream Cake
Now that you’ve prepared the brownies and toasted hazelnuts, it’s time to assemble your ice cream cake. This recipe assumes you’re using a 9-inch springform pan, but any round pan will work as long as it has high sides.
- Ingredients for the Ice Cream Cake:
- 1.5 quarts (1.4 liters) of vanilla ice cream, slightly softened
- Brownie bits (from Step 1)
- 1 cup toasted hazelnuts (from Step 2)
- Optional: chocolate ganache, whipped cream, or extra brownie crumbs for garnish
- Assembly Instructions:
- Line the bottom of the springform pan with parchment paper for easy removal.
- Start by spreading a layer of softened vanilla ice cream (about 1/3 of the total amount) evenly across the bottom of the pan.
- Sprinkle a generous handful of brownie bits over the ice cream layer, pressing them slightly into the ice cream.
- Add some chopped toasted hazelnuts over the brownie layer for added crunch.
- Repeat with another layer of vanilla ice cream, followed by more brownie bits and hazelnuts.
- Finish with a final layer of ice cream on top, smoothing it out with a spatula.
- Cover the pan with plastic wrap and freeze the cake for at least 4 hours, or until fully set.
Step 4: Final Touches
After the cake has frozen solid, you can add final touches to make it even more impressive. Consider topping your ice cream cake with a drizzle of chocolate ganache, whipped cream, or extra brownie crumbs.
- Chocolate Ganache:
- To make the ganache, heat ½ cup of heavy cream until just boiling. Remove from heat and pour over 1 cup of chopped dark chocolate.
- Stir until smooth, and let it cool slightly before drizzling it over the ice cream cake.
- Serving:
- Before serving, remove the ice cream cake from the springform pan. If it’s sticking, wrap a warm towel around the edges for a few seconds to loosen it.
- Garnish the top with extra toasted hazelnuts, brownie crumbs, or a drizzle of chocolate ganache.
- Slice the cake with a sharp knife dipped in warm water for clean cuts.
Customizing Your Ice Cream Cake
While the combination of vanilla ice cream, chocolate brownie bits, and toasted hazelnuts is already a winning flavor, there’s plenty of room for customization:
- Flavor Variations:
- Swap the vanilla ice cream for chocolate or coffee ice cream for a deeper flavor.
- Add layers of fruit, such as raspberries or bananas, between the ice cream layers for a fruity twist.
- Textural Enhancements:
- Add more textures to the cake by incorporating elements like caramel sauce, toffee bits, or marshmallow fluff between the layers.
- For an extra crunch, sprinkle crushed waffle cones or pretzels in between the layers.
- Dietary Considerations:
- If you’re looking to make a gluten-free version, use gluten-free brownies and ensure the ice cream is gluten-free as well.
- For a dairy-free option, substitute regular ice cream with a dairy-free version made from coconut milk or almond milk, and use a vegan brownie recipe.
The Science Behind Ice Cream Cakes
Ice cream cakes are more than just a delicious dessert—they also involve interesting scientific principles, particularly in how they’re constructed and stored.
- Texture Contrast: One of the most enjoyable aspects of an ice cream cake is the contrast in textures. The creamy softness of the ice cream complements the chewy brownie bits and crunchy toasted hazelnuts. This balance of textures provides a satisfying eating experience, as your taste buds engage with a variety of sensations.
- Temperature Management: A key challenge with ice cream cakes is ensuring they stay solid without melting too quickly when served. The freezing process is crucial, as it allows the ice cream layers to firm up while keeping the brownie bits soft but not soggy.
- Flavor Perception: The cold temperature of ice cream can dull the perception of sweetness, so adding flavorful mix-ins like brownies and toasted hazelnuts helps to intensify the taste experience. Brownies add a concentrated chocolate flavor, while toasted hazelnuts bring a toasty, aromatic quality that cuts through the richness of the ice cream.
Serving and Storing Your Ice Cream Cake
Ice cream cakes are best served slightly softened but still firm. To achieve this, remove the cake from the freezer about 10-15 minutes before serving to allow the ice cream to soften slightly. This will make cutting and serving easier while maintaining the cake’s structure.
If you have leftovers (which is rare, given how delicious this cake is!), cover the remaining cake with plastic wrap or store it in an airtight container. Ice cream cakes can be stored in the freezer for up to two weeks, though the texture of the brownies and hazelnuts may start to change slightly over time due to freezer exposure.
Conclusion
Creating a frozen ice cream cake with vanilla ice cream, chocolate brownie bits, and toasted hazelnuts offers a truly indulgent and satisfying dessert experience. This combination of flavors and textures strikes the perfect balance between creamy, crunchy, and chewy, making it an ideal treat for any occasion. Whether you’re celebrating a special event or simply indulging in a homemade dessert, this ice cream cake is sure to be a hit with family and friends.
By following the steps in this guide, you’ll be able to make a customizable ice cream cake that caters to your preferences while showcasing the delightful flavors of vanilla ice cream, rich chocolate brownies, and the nutty crunch of toasted hazelnuts.